
Last year I started TheHappyGivers.com. The idea was to self-fund our non-profit work through a cool platform that sold apparel and goods we believed in. And in just our second month, we began to see amazing results!
Our store sells between $90,000 to $130,000 every month. After production cost, we use 100% of the profits to fund our Children’s Home in Peru (Casa de Paz) and fund our ongoing relief work in Puerto Rico.
Now, it’s your turn!
If you’re wanting a store for your non-profit, or extra income for your family, or you have an idea that has the potential to generate a full-time salary… here is The Step By Step Guide To Your Online Store.
I use Shopify.com. It’s the easiest e-commerce solution to sell your products online in a beautiful storefront designed with mobile in mind. I recommended it because I’ve tried various store solutions and Shopify beats them all. The payment integrations and template library beats their competitors. Also, they have a great app for your phone and amazing customer service.
Ok, you ready?
1. Sign Up with Shopify:
Signing up with Shopify and starting your store is super easy and they offer a 14 day free trial to get you started. To start, CLICK HERE and create your account.
Enter your information and click ‘Create your store now’.
Note that your store name needs to be distinctive or Shopify will ask you to choose something else.
After this, you’ll be asked for a few more details, these include your name, address, country and a contact number.
You will also be asked if you have products and, if so, what you aim to sell.
Once complete, click ‘I’m done’.
2. Begin Setting Up Your Shop:
After you’ve signed up you’ll be directed straight to your store admin screen. Now you are ready to start customising your store’s look, uploading products and setting up payments and shipping.
* Your home admin screen tells you all you need to know to get you up and running.
3. Select a “Theme” or “Layout”:
Shopify has its own theme store and the themes are all guaranteed to have full support from the designers.
Also, all the themes come with a comprehensive list of modifications you can make without having to touch a line of code. The premium themes come with more modifications, but that’s not to say you can’t achieve a great looking site with a free one. These changes are outlined in the next section.
If you want to make wholesale changes to a theme, there are very few limitations on what can be achieved by accessing the HTML and CSS. Don’t worry if you haven’t got any coding experience. Shopify has an international team of design agencies they call ‘Shopify Experts’ that you can hire to fully customise your site.
To find a theme that suits your needs we recommend the following:
1. Look Through the Theme Store: Log into Shopify and visit the Shopify Theme Store at themes.shopify.com. Here you’ll find over 180 theme variations to choose from, including a good selection of free ones.
You can filter by paid or free, industry and by features. You can also sort themes by price, popularity, and most recent.

* The Shopify Theme Store.
2. Check the functionality and reviews: Once you’ve found a theme you like, click on the theme’s sample image. You’ll be given more information about the theme, such as whether the theme is responsive/mobile ready among other features.
Scroll down to read some reviews to find out what e-tailers using the theme think of it.
3. Preview the theme: To see the theme in action, click View Demo. You’ll see this below the green ‘Preview Theme in your Store’ button.
If the theme comes in a range of styles, you can also view demos of the different styles by clicking on them.
4. Install The Theme: Once you’ve found a theme you like, click the green button.
Shopify will ask you to confirm that you want to install the theme.
Click Publish as my Shop’s Theme.
Don’t worry if you’re not 100% sure it’s the right theme for you. You can always change your mind later.
After the theme has installed, Shopify will let you know, and will give you the option to Go to your Theme Manager.
Your theme manager shows published themes (the one you installed or activated most recently) and unpublished themes below (previously installed themes).

4. Edit Shopify Settings
The majority of Shopify themes allow you to make simple changes that can massively change the appearance of your store, so you can rest assured knowing you won’t end up with a website that looks like a clone of thousands of other stores.
* These stores were all built using the same theme.
On your admin screen, select ‘Themes’ from the left hand navigation menu. On this page you will see your live theme in a box at the top, in the top right hand corner of that box will be two buttons. The first one is of three dots, which gives you some basic settings changes. One of these allows you to make a duplicate of the theme. We highly recommend you do this incase you make some changes you don’t like, then you can delete the duplicate and start again. The second button says ‘Customize Theme’. If you click that you will be taken to a page that controls all the basic functionality of your store. This is a great time for you to have a thorough play with the settings and test out all the features so you can find out what your site is capable of.

* Your themes custom settings.
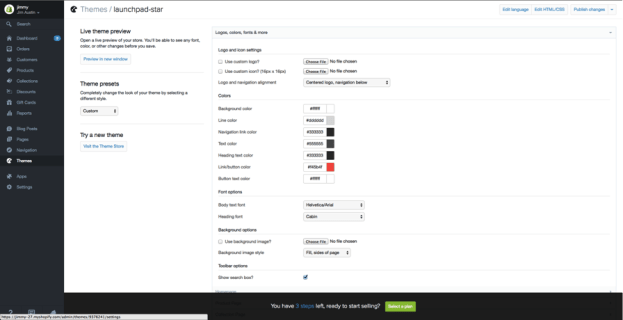
*Changing colors in your theme.
The most common features will include:
Uploading logos
Uploading slides to a homepage carousel
Adding related item functionality to product pages
Choosing how many items appear on each line of the collection pages
Color schemes
Font choices.
Some themes will also allow you to reposition elements on pages such as showing product images on the left, right or center of the page. You can also choose whether you want to display social like/tweet/pin/+1 buttons.
5. Add Your Products to The Store
Again, navigating from the bar on the left select ‘Products’. You will then see a blue ‘Add a product’ button in the top right hand corner of the page. Use the following screen to add as much detail as needed about your products. Especially look at those that will help with SEO such as name, description and URL. Also include as much detail about variants as possible to help inform customers about your items.
This is also the screen where you upload product pictures. Once the images are uploaded you can rearrange them so don’t worry about uploading them in any particular order.
 * The Product screen. Make sure you fill out as much information as possible.
Product images can make a sale so make sure you show your products off to their best and highlight any special or unique features with close up photos. To keep your store looking tidy we suggest you keep all images the same dimensions. Unless of course you plan to make your collection pages look like a Pinterest board.
Once everything is filled out always remember to click the ‘Save product’ button in the top and bottom right hand corners.
Set up collections (group of products)
A collection is any group of products that have some feature in common that customers might look for when visiting your store. For example, your customers might be shopping for:
Clothes specifically for men, women, or children
Items of a certain type, such as lamps, cushions, or rugs
Items on sale
Items in a certain size or color
Seasonal products such as holiday cards and decorations.
Products can appear in any number of collections. Usually, you would display your collections on your homepage and in the navigation bar. This helps customers find what they’re looking for without having to click through your whole catalog.
 * The Collection set up screen works in exactly the same way as the Product screen
Manual and automatic collections:
When you add a new collection, you can select how products should be added to it.
These are the two options:
Manually - You add and remove products in a manual collection individually.
Automatically - You can set up selection conditions to automatically include products that meet certain criteria.
Payment gateways: A payment gateway allows you to take payment from your customers via your website. The price and commission rate is important, but it’s also important to see what features they offer. Not all payment gateways are created equal.
You need to look at the following when choosing the right payment gateway for you.

Transaction Fees
When you take a payment, some gateways will keep a small percentage or flat fee (or sometimes both) for letting you use their service. Compare these based on what your anticipated sales are.
Card Types
You need to know what types of card are accepted by your chosen Payment Gateway. All accept VISA and Mastercard, while most accept American Express. Paypal is also becoming popular for online payments.
Offsite Checkout
Some gateways will take the payment on their own servers via their own form. This means the customer is taken away from your checkout and they pay on the form provided by your payment gateway. They are then redirected to your confirmation page once the customer successfully pays. This allows you to have a bit more control of the checkout process. Now you can circumvent Shopify’s limitations in that they don’t let you customise the checkout other than with CSS.
Payment gateway transaction fees are added on top of Shopify’s own transaction fees. However as of November stores based in the US and UK can use Shopify Payments. Depending upon your Shopify plan, you can save on these extra costs. Relative to your plan you will receive these highly appealing rates.
Basic 2.4% + 20p
Professional 2.1% + 20p
Unlimited 1.8% + 20p
Depending on how many transactions you make every month it could be worth upgrading to take advantage of these savings.
If you live in the US or UK your store will automatically use Shopify Payments. To complete this, click the ‘Complete Shopify Payments account setup’ button found in Settings > Payments. If you wish to use a third party gateway you can use the ‘enable payment gateways’ link on the same page.
6. Go “LIVE”
Before your site can go live you need to add a few more details about your company and how you plan to make deliveries and pay tax.
General: Make sure all your business information is filled out on this page. Also make sure to make use of the Google Analytics feature. This can prove to be an invaluable source for tracking your stores visitors.

Taxes:

Go to the Products page of your admin
Click on the name of a given product.
Scroll down to the section called “Inventory & variants”.
Click on the edit link next to your Product Variant to open a dialog window.
Make sure the checkboxes next to Charge taxes and Requires shipping are checked if you need to include these with your products.
Some stores won’t need to charge taxes or shipping on products like digital goods. On the other hand, a T-shirt store will likely need to charge both.
If you are planning to ship your product to customers, make sure to enter the product’s weight in the appropriate field.
Shipping: If your shipping rates are too narrow, or you don’t give enough options, you may lose out on some sales. Shopify will only calculate a shipping rate for your customers based on the rules that you define in the Shipping page of the admin. To make sure you won’t lose any sales:

From your store admin, go to the Settings > Shipping page.
In the “Shipping rates” section, look to see if you have set a weight-based shipping rate and adjust it according to your product’s specifications.
7. Consider Buying a Domain Name
To get your site live you’ll need a domain name. You have two choices for this. Firstly you can buy a domain from Shopify and it will be added to your store automatically. This saves you time, especially if you have no knowledge of hosting a website. These domains typically cost $9-$14 USD per year. Your second option is to purchase a domain from a third party such as GoDaddy. These domains start from $1.99 USD a year. The downside is that you’ll have to redirect the DNS records yourself which can seem daunting at first.
Congratulations!
Now that you have your store, keep playing around with ideas, templates and products. Trust me, it works! If you’re passionate about it and share it with your friends and family… soon, you will find yourself being successful as an online entrepreneur.
Again, if you have any questions, email me at carlos@happysonship.com.
Peace.
+ Here's the company I use to create, edit, print and send all my apparel. They are called Printify and they are my #1 partners in this. Make your life easier, work with Printify. 